在micropython中绑定python函数到c函数
(这篇文章承接上篇文章“将micropython嵌入Arduino项目”)
https://www.limfx.pro/ReadArticle/2995/jiang-micropython-qian-ru-arduino-xiang-mu
背景介绍
python module
当编写Python程序时,我们经常会引入别人编写好的模块(module)
我们用的python大多是cpython(用c写的),这些module其实有两种来源
python文件,一个python文件对应一个module
c文件,涉及到绑定机制,即将c/cpp函数绑定为python函数
所以,我们其实可以自己编写cexample.c作为module,再进行绑定,就可以在python里面进行这样的操作了
import cexample
cexample.cfunction()
micropython是python在嵌入式设备中的精简子集,上述一样可行
参考资料
micropython官网在多处给出了案例:
https://docs.micropython.org/en/latest/develop/cmodules.html
https://docs.micropython.org/en/latest/develop/porting.html#adding-a-module-to-the-port
阅读这些文章了解如何实现绑定
工作流程
通过阅读上述文章+个人尝试,我总结出了实现binding的本质的三个条件,我个人称之为“三相之力”
example.c或example.cpp文件,里面有我们要绑定的c函数
moduledefs.h ,这个文件定义了micropython能import什么module
qstrdefs.generated.h,这个文件定义了micropython所需的qstr
qstr有关内容具体可见
https://docs.micropython.org/en/latest/develop/qstr.html
简单总结一下就是:QSTR(uniQue STRing),micropython会将一些字符串intern(驻留)在ROM中来加快访问速度,比如说模块名,函数名都是qstr。
而且qstr是需要通过复杂的过程生成的,如果缺少对应qstr就会报错。
目标需求
承接上文“将micropython嵌入到Arduino项目”,在Arduino项目中我有两个数组float *channelSample和float *outputchannelSample
我想要编写两个python函数getvalue(channelNo)和setvalue(channelNo,val),使其能在embed_micropython中对两个数组进行读写
凑齐三相之力
三相之力中的example.c是我们参考案例自己写的,而moduledefs.h和qstrdefs.generated.h都是要make自动生成的
我们的操作分为两部分,先在linux下准备三相之力,然后再移植到windows中给我们的Arduino项目使用
现在让我们进入linux系统进行操作
如果还没能在unix环境下使用micropython的,请参考这篇文章
https://github.com/micropython/micropython/wiki/Getting-Started
example.c部分
这部分关系到另一个问题:C和C++混合编程,具体请看我另一篇文章
https://www.limfx.pro/ReadArticle/3005/c-yuchun-he-bian-cheng
然后幸运的是,micropython官方给了我们一个案例,在micropython/examples/usercmodule下,分别有c和cpp两个例子用于参考
将micropython/examples/usercmodule/cppexample下的三个文件进行修改,改成如下
//example.cpp
extern "C" {
#include <examplemodule.h>

float channelsample[11]={0,1,2,3,4,5,6,7,8,9,10};
float outputchannelsample[11]={0,1,2,3,4,5,6,7,8,9,10};

float *channels=channelsample;
float *outputchannels=outputchannelsample;

mp_obj_t getvalue(mp_obj_t i_obj) {
    const int i = mp_obj_get_int(i_obj);
    return mp_obj_new_float(channels[i]);
}

mp_obj_t setvalue(mp_obj_t i_obj,mp_obj_t val_obj) {
    const int i = mp_obj_get_int(i_obj);
    const float val=(float)mp_obj_get_float(val_obj);
    if(i>=0&&i<=10) {
        outputchannels[i]=val;
        return mp_obj_new_int(1);
    }
    return mp_obj_new_int(0);
}

}
注意我这里先初始化了两个float数组然后用两指针指向这两个数组,为什么我不直接到位让两指针指到我项目中的数组呢?
因为我项目在windows,还要复制过来一堆依赖很麻烦,先弄两个数组作为权宜之计能过通过编译
//examplemodule.h
// Include MicroPython API.
#include "py/runtime.h"

// Declare the function we'll make available in Python as cppexample.getvalue().
extern mp_obj_t getvalue(mp_obj_t i_obj) ;
// Declare the function we'll make available in Python as cppexample.setvalue().
extern mp_obj_t setvalue(mp_obj_t i_obj,mp_obj_t val_obj);
//examplemodule.c
#include <examplemodule.h>

// Define a Python reference to the function we'll make available.
// See example.cpp for the definition.
STATIC MP_DEFINE_CONST_FUN_OBJ_1(getvalue_obj, getvalue);
STATIC MP_DEFINE_CONST_FUN_OBJ_2(setvalue_obj, setvalue);

// Define all properties of the module.
// Table entries are key/value pairs of the attribute name (a string)
// and the MicroPython object reference.
// All identifiers and strings are written as MP_QSTR_xxx and will be
// optimized to word-sized integers by the build system (interned strings).
STATIC const mp_rom_map_elem_t cppexample_module_globals_table[] = {
    { MP_ROM_QSTR(MP_QSTR___name__), MP_ROM_QSTR(MP_QSTR_cppexample) },
    { MP_ROM_QSTR(MP_QSTR_getvalue), MP_ROM_PTR(&getvalue_obj) },
    { MP_ROM_QSTR(MP_QSTR_setvalue), MP_ROM_PTR(&setvalue_obj) },
};
STATIC MP_DEFINE_CONST_DICT(cppexample_module_globals, cppexample_module_globals_table);

// Define module object.
const mp_obj_module_t cppexample_user_cmodule = {
    .base = { &mp_type_module },
    .globals = (mp_obj_dict_t *)&cppexample_module_globals,
};

// Register the module to make it available in Python.
MP_REGISTER_MODULE(MP_QSTR_cppexample, cppexample_user_cmodule);
这三个文件已经包括了绑定c函数的过程了,我们也可以参考这三个文件创建任何我们想要的函数
把这三个文件复制到windows保存好
三相之力另两相
然后在终端下进入micropython/ports/unix目录,输入指令
make USER_C_MODULES=../../examples/usercmodule
这会在micropython/ports/unix下生成build-standard文件夹,在build-standard/genhdr下有我们三相之力的另两个文件moduledefs.h和qstrdefs.generated.h,把这两个文件复制到windows保存好
开始施法
下面进入到windows系统进行操作
在\.platformio\lib\micropython_embed(这个文件夹的创建具体见上一篇文章“将micropython嵌入到Arduino项目中”)中
将example.cpp,examplemodule.h,examplemodule.c三个文件复制到micropython_embed/ports下,然后将example.cpp修改为
extern "C" {
#include "examplemodule.h"

extern float *channels;
extern float *outputchannels;
extern int totalChannelNum;

mp_obj_t getvalue(mp_obj_t i_obj) {
    const int i = mp_obj_get_int(i_obj);
    if(i>=0 && i<totalChannelNum){
        return mp_obj_new_float(channels[i]);
    }
    return mp_obj_new_float(0.0/0.0);
}

mp_obj_t setvalue(mp_obj_t i_obj,mp_obj_t val_obj) {
    const int i = mp_obj_get_int(i_obj);
    const float val=(float)mp_obj_get_float(val_obj);
    if(i>=0&&i<totalChannelNum) {
        outputchannels[i]=val;
        return mp_obj_new_int(1);
    }
    return mp_obj_new_int(0);
}

}
上文提到了linux下的example.cpp为了通过编译我们作了权宜之计,现在我们修改使其适配我们的项目
然后打开micropython_embed/genhdr,我们能看到moduledefs.h和qstrdefs.generated.h,不要直接拿linux复制过来的那两个文件直接替换
分别打开两个moduledefs.h进行比对,然后复制黏贴加上我们需要的module定义
分别打开两个qstrdefs.generated.h进行比对,然后复制黏贴加上我们需要的qstr定义
如何知道哪些定义是我们需要的呢?
在moduledefs.h中搜素cppexample,找到那一段就是
在qstrdefs.generated.h中搜索cppexample,setvalue,getvalue(其实就是模块名和函数名)
然后在项目中进行编译,如果有报错就根据报错信息修改,如果是undefine reference to mp_qstr_xxx找是不是缺了qstr定义,然后继续搜索复制
上文我们在qstrdefs.generated.h中加入的是
QDEF(MP_QSTR_cppexample, 26574, 10, "cppexample")
QDEF(MP_QSTR_getvalue, 44152, 8, "getvalue")
QDEF(MP_QSTR_setvalue, 492, 8, "setvalue")
然后又报错了,信息是找不到float类型定义,查找micropython有关float定义,原来是没有指定float与平台的对应 然后在micropython/mpconfigport.h下加入这条语句
#define MICROPY_FLOAT_IMPL (MICROPY_FLOAT_IMPL_FLOAT)
然后在qstrdefs.generated.h再加入
QDEF(MP_QSTR_complex, 40389, 7, "complex")
QDEF(MP_QSTR_float, 17461, 5, "float")
QDEF(MP_QSTR_real, 63935, 4, "real")
QDEF(MP_QSTR_imag, 46919, 4, "imag")
QDEF(MP_QSTR___float__, 28725, 9, "__float__")
QDEF(MP_QSTR___complex__, 58053, 11, "__complex__")
还要在NeoPLC项目中写两个全局变量float *指向两数组,编译通过,任务圆满完成
总结一下:这里我使用的方法其实是“面向报错信息编程”,这篇文章中我的工作流程是非常清晰的,但一开始尝试时没有那么简单,我都是想到一个思路然后进行尝试,然后遇到种种问题,经历了无数的报错后,根据报错信息反复修改才编译成功的
成果展示
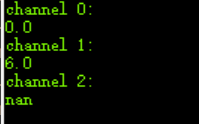
这是我要测试的代码,此时数组里面大小为2,channels[0]我设置为0,channels[1]我设置为6,然后用micropython读取channels[0]和channels[1]和channels[2](不存在)
static const char *example_4 =
    "from cppexample import getvalue\n"
    "print('channel 0:')\n"
    "print(getvalue(0))\n"
    "print('channel 1:')\n"
    "print(getvalue(1))\n"
    "print('channel 2:')\n"
    "print(getvalue(2))\n"
    ;
结果在串口打印如下所示

文件仓库
我把lib/micropython_embed上传到gitlab了
http://www.jtext.cn:23080/zhdyz/neoplc-plus
下载置于.platform文件夹下即可使用
本文章使用limfx的vscode插件快速发布