如何通过PlatformIO编译ESP32的MicroPython固件
花了很长一段时间尝试使用PlatformIO IDE将MicroPython固件烧录到ESP32中,遇到了很多坑,同时也留下了很多坑,在这里将过程完整记录下来。本文件于2020.10.26创建。建议读者在阅读本文之前花几分钟对Linux命令行、gcc的C/C++编译汇编链接过程以及Makefile进行初步的了解。
系统环境
Windows 10 Pro Edition v2004 + PlatformIO IDE v2.1.3 on VSCode + Ubuntu 18.04LTS on WSL1
如果不安装双系统,建议使用虚拟机或WSL1运行Linux,不建议WSL2,因为WSL2默认不包含串行支持和USB设备支持。
同时建议选择两三年前发布的各方面通用性稳定性有保证的Linux发行版。
建议安装VSCode的Remote - WSL插件方便在WSL中编辑代码。
VSCode PlatformIO IDE v2.1.1和v2.1.2存在严重bug,请立即升级至v2.1.3及以上或降级至v2.1.0。
如果需要进行调试请将.platformio/tool-openocd-esp32下的bin/和share/替换成github上最新的OpenOCD release下载的压缩包解压出来的两个对应的bin/和share/。注意不要更改.piopm和package.json,否则会自动替换为错误版本的OpenOCD。
详细过程
MicroPython提供的官方教程请自行参阅github repo的README。下面的内容也涉及到了其中的一些步骤。
首先在Linux下安装一下软件包用于编译ESP-IDF。ESP-IDF是乐鑫科技官方退出的针对ESP32系列芯片的开发框架。
$ sudo apt-get install git wget flex bison gperf python python-pip python-setuptools cmake ninja-build ccache libffi-dev libssl-dev dfu-util
设置Python3为默认Python版本
$ sudo apt-get install python3 python3-pip python3-setuptools

$ sudo update-alternatives --install /usr/bin/python python /usr/bin/python3 10
克隆MicroPython代码仓库
$ git clone https://github.com/micropython/micropython.git
观察目录中的py/mkenv.mk、py/mkrule.mk和py/py.mk这三个Makefile。前者为后者定义各种变量;后者提供了本工程的编译规则,github仓库下载的默认版本会在编译时在对应芯片的build/py/目录下为py/目录下的*.c文件生成对应的/build/py/*.o文件。py/py.mk用于辅助各个port的编译,指明了编译micropython核心库的各个目标文件路径。
克隆ESP-IDF代码仓库。
$ mkdir ~/esp

$ cd ~/esp

$ git clone --recursive https://github.com/espressif/esp-idf.git

$ export ESPIDF=$HOME/esp/esp-idf
由于MicroPython仅支持特定版本的ESP-IDF,需要切换到特定版本对应的branch。这里请切换到v4.0,因为PlatformIO自动下载的esp-idf版本也是v4。
$ cd ~/micropython/ports/esp32

$ make ESPIDF=
# 将显示支持版本的哈希值
# Current git hash:
# Supported git hash (v3.3): 9e70825d1e1cbf7988cf36981774300066580ea7
# Supported git hash (v4.0) (experimental): 4c81978a3e2220674a432a588292a4c860eef27b
# 选择v4.0

$ cd $ESPIDF

$ git checkout <Current supported ESP-IDF commit hash>

$ git submodule update --init --recursive
安装Python依赖包
$ cd ~/esp-idf

$ pip3 install -r requirements.txt
使用IDF脚本安装ESP-IDF编译工具链
$ ./install.sh
设置环境变量
$ vim ~/.bash_profile
# 添加下一行
# export IDF_PATH=$HOME/esp/esp-idf
# 若读者使用zsh等其他版本的shell请自行修改相关文件,Ubuntu默认使用的是bash

$ source ~/.bash_profile
然后回到micropython中esp32 port进行编译工作。
$ cd micropython/port/esp32

$ source $ESP-IDF/export.sh
这里使用的传统GNU Make。
(这一步应该是没必要的)Makefile中修改型号波特率端口等信息,WSL1中端口/dev/ttySX对应Windows设备管理器中的COMX。
...
ESPIDF = $(IDF_PATH)
PORT ?= /dev/ttyS6
BAUD ?= 115200
FLASH_MODE ?= dio
FLASH_FREQ ?= 40m
FLASH_SIZE ?= 4MB
...
删除一些可能影响后续工作的无用功能,比如BLE。
# Support BLE by default.
# Can be explicitly disabled on the command line or board config.
# MICROPY_PY_BLUETOOTH ?= 1
MICROPY_PY_BLUETOOTH ?= 0
ifeq ($(MICROPY_PY_BLUETOOTH),1)
SDKCONFIG += boards/sdkconfig.ble

# Use NimBLE on ESP32.
# MICROPY_BLUETOOTH_NIMBLE ?= 1
MICROPY_BLUETOOTH_NIMBLE ?= 0
# Use Nimble bindings, but ESP32 IDF provides the Nimble library.
MICROPY_BLUETOOTH_NIMBLE_BINDINGS_ONLY = 1
include $(TOP)/extmod/nimble/nimble.mk
endif
在Makefile中添加下面几行,我们的目标是将MicroPython编译成静态链接库方便调用。
################################################################################
# Main targets

all: $(BUILD)/firmware.bin

.PHONY: idf-version deploy erase

idf-version:
	$(ECHO) "ESP IDF supported hash: $(ESPIDF_SUPHASH)"

$(BUILD)/firmware.bin: $(BUILD)/bootloader.bin $(BUILD)/partitions.bin $(BUILD)/application.bin
	$(ECHO) "Create $@"
	$(Q)$(PYTHON) makeimg.py $^ $@

deploy: $(BUILD)/firmware.bin
	$(ECHO) "Writing $^ to the board"
	$(Q)$(ESPTOOL) --chip esp32 --port $(PORT) --baud $(BAUD) write_flash -z --flash_mode $(FLASH_MODE) --flash_freq $(FLASH_FREQ) 0x1000 $^

erase:
	$(ECHO) "Erasing flash"
	$(Q)$(ESPTOOL) --chip esp32 --port $(PORT) --baud $(BAUD) erase_flash

# ------------added lines---------------
staticlib:
	$(ECHO) "LIB micropython lib"
	$(Q)$(AR) rsc $(BUILD)/libmicropython.a $(OBJ)
# ------------added lines---------------

################################################################################
编译mpy-cross,其功能是将标准Python脚本编译为MicroPython支持的.mpy文件。
$ cd ../mpy-cross

$ make mpy-cross
返回esp32 port,给main.c的主函数app_main改个名字,防止后续命名冲突。
// void app_main(void) {
void mp_app_main(void) {
    esp_err_t ret = nvs_flash_init();
    if (ret == ESP_ERR_NVS_NO_FREE_PAGES || ret == ESP_ERR_NVS_NEW_VERSION_FOUND) {
        nvs_flash_erase();
        nvs_flash_init();
    }
    xTaskCreatePinnedToCore(mp_task, "mp_task", MP_TASK_STACK_SIZE / sizeof(StackType_t), NULL, MP_TASK_PRIORITY, &mp_main_task_handle, MP_TASK_COREID);
}
(以下是留下的坑,请参考附录)(2020.10.27这个坑解决了,参考后文,这部分请跳过)
在port/esp32/mpconfigport.h把MICROPY_PY_THREAD和MICROPY_PY_THREAD_GIL改成0。
#define MICROPY_PY_USELECT                  (1)
#define MICROPY_PY_UTIME_MP_HAL             (1)
// #define MICROPY_PY_THREAD                   (1)
#define MICROPY_PY_THREAD                   (0)
// #define MICROPY_PY_THREAD_GIL               (1)
#define MICROPY_PY_THREAD_GIL               (0)
#define MICROPY_PY_THREAD_GIL_VM_DIVISOR    (32)
(以上是留下的坑,请参考附录)(2020.10.27这个坑解决了,参考后文,这部分请跳过)
然后执行命令开始编译
$ make
这里需要等个几分钟,最后应该会报下面这个错误
build-GENERIC/esp-idf/esp32/libesp32.a(cpu_start.o): In function `main_task':
cpu_start.c:(.text.main_task+0x30): undefined reference to `app_main'
Makefile:786: recipe for target 'build-GENERIC/application.elf' failed
make: *** [build-GENERIC/application.elf] Error 1
不要慌,报这个错误是因为刚才我们把app_main改了,需要的目标文件已经编译完成了,都在port/esp32/build-GENERIC/目录下。
然后运行下面这个命令
make staticlib
执行完毕后会发现port/esp32/build-GENERIC多了一个libmicropython.a文件。这里我们将MicroPython相关的目标文件打包成了静态链接库,以简化PlatformIO相关的后续工作。
然后我们需要将相关文件添加到PlatformIO下。如果PlatformIO在Windows下且使用的是WSL,可以执行以下命令在Windows的文件资源管理器下打开子系统的文件目录。
explorer.exe .
(以下是留下的坑,下面的文件可能有没用的,但我不确定哪些没用,请参阅附录)
在C:\Users\rui\.platformio\lib\新建一个MicroPythonEmbedded文件夹。然后将Linux下的以下文件复制进去:
port/esp32/build-GENERIC/libmicropython.a- (2020.10.28更新)
port/esp32/build-GENERIC/genhdr/qstrdefs.generated.h port/esp32/下的所有头文件py/下的所有头文件lib/utils/interrupt_char.h、lib/utils/pyexec.hlib/timeutils/timeutils.hlib/netutils/netutils.hlib/mp-readline/readline.h
注意不能有.c文件,否则PlatformIO中编译会报错。
完成后的.platformio\lib\MicroPythonEmbedded目录应该是如下结构:
MicroPythonEmbedded
├── gccollect.h
├── lib
│   ├── genhdr
│   |   └── qstrdefs.generated.h
│   ├── libmicropython.a
│   ├── mp-readline
│   │   └── readline.h
│   ├── netutils
│   │   └── netutils.h
│   ├── timeutils
│   │   └── timeutils.h
│   └── utils
│       ├── interrupt_char.h
│       └── pyexec.h
├── machine_rtc.h
├── memory.h
├── modesp.h
├── modesp32.h
├── modmachine.h
├── modnetwork.h
├── mpconfigboard.h
├── mpconfigport.h
├── mphalport.h
├── mpthreadport.h
├── py
│   ├── asmarm.h
│   ├── asmbase.h
│   ├── asmthumb.h
│   ├── asmx64.h
│   ├── asmx86.h
│   ├── asmxtensa.h
│   ├── ...
│   ├── stream.h
│   ├── unicode.h
│   └── vmentrytable.h
├── qstrdefsport.h
└── uart.h
(以上是留下的坑,请参阅附录)
(以下是留下的坑,请参阅附录)(这部分有更新,不用看了,参考后文)
然后在PlatformIO IDE中新建工程。修改pio project下的sdkconfig文件,添加下面几行
# PPPoS
CONFIG_LWIP_PPP_SUPPORT=y
CONFIG_LWIP_PPP_PAP_SUPPORT=y
CONFIG_LWIP_PPP_CHAP_SUPPORT
# FreeRTOS
CONFIG_FREERTOS_SUPPORT_STATIC_ALLOCATION=y
(以上是留下的坑,请参阅附录)(这部分有更新,不用看了,参考后文)
2020.10.27更新
然后在PlatformIO IDE中新建工程。修改pio project下的sdkconfig文件,添加下面几行
CONFIG_ESP32_SPIRAM_SUPPORT=y
# PPPoS
CONFIG_LWIP_PPP_SUPPORT=y
CONFIG_LWIP_PPP_PAP_SUPPORT=y
CONFIG_LWIP_PPP_CHAP_SUPPORT
# FreeRTOS
CONFIG_FREERTOS_SUPPORT_STATIC_ALLOCATION=y
CONFIG_FREERTOS_THREAD_LOCAL_STORAGE_POINTERS=2
然后在src添加mpHelper.c,在include添加mpHelper.h,代码分别如下:
/* mpHelper.c */
#include "mpHelper.h"

// static char heap[16384];
// static char heap[2048];
static char *stack_top;

#define MP_TASK_STACK_SIZE (16 * 1024)

mp_obj_t execute_from_str(const char *str)
{
    nlr_buf_t nlr;
    if (nlr_push(&nlr) == 0)
    {
        qstr src_name = 1 /*MP_QSTR_*/;
        mp_lexer_t *lex = mp_lexer_new_from_str_len(src_name, str, strlen(str), false);
        mp_parse_tree_t pt = mp_parse(lex, MP_PARSE_FILE_INPUT);
        mp_obj_t module_fun = mp_compile(&pt, src_name, false);
        mp_call_function_0(module_fun);
        nlr_pop();
        return 0;
    }
    else
    {
        // uncaught exception
        return (mp_obj_t)nlr.ret_val;
    }
}

void mp_start()
{
    volatile uint32_t sp = (uint32_t)get_sp(); // get stack pointer
    // mp_thread_init(pxTaskGetStackStart(NULL), MP_TASK_STACK_SIZE / sizeof(uintptr_t)); // ?????
    uart_init();

    size_t mp_task_heap_size = heap_caps_get_largest_free_block(MALLOC_CAP_8BIT);
    void *mp_task_heap = malloc(mp_task_heap_size);

    mp_stack_set_top((void *)sp);
    mp_stack_set_limit(MP_TASK_STACK_SIZE - 1024);
    gc_init(mp_task_heap, mp_task_heap + mp_task_heap_size);
    mp_init();
    mp_obj_list_init(mp_sys_path, 0);
    // mp_obj_list_append(mp_sys_path, MP_OBJ_NEW_QSTR(MP_QSTR_));
    // mp_obj_list_append(mp_sys_path, MP_OBJ_NEW_QSTR(MP_QSTR__slash_lib));
    mp_obj_list_init(mp_sys_argv, 0);
    readline_init0();

    // mp_deinit();
}

/* mpHelper.h */
#ifndef MPHELPH
#define MPHELPH

#include <string.h>
#include "py/stackctrl.h"
#include "py/nlr.h"
#include "py/compile.h"
#include "py/runtime.h"
#include "py/persistentcode.h"
#include "py/repl.h"
#include "py/gc.h"
#include "py/mphal.h"
#include "lib/mp-readline/readline.h"
#include "lib/utils/pyexec.h"
#include "uart.h"
#include "esp32/spiram.h"
#include <stdio.h>
#include <stdlib.h>
mp_obj_t execute_from_str(const char *str);
void mp_start();
#endif
然后main.c中
#include <string.h>
#include "freertos/FreeRTOS.h"
#include "freertos/task.h"
#include "esp_system.h"
#include "esp_wifi.h"
#include "esp_event.h"
#include "esp_log.h"
#include "nvs_flash.h"
#include "lib/utils/pyexec.h"

#include "lwip/err.h"
#include "lwip/sys.h"

#include <stdio.h>
#include <stdlib.h>
#include "driver/gpio.h"

#include "mpHelper.h"

#define GPIO_OUTPUT_IO_0 2

#define GPIO_OUTPUT_PIN_SEL (1ULL << GPIO_OUTPUT_IO_0)

void app_main()
{
  //Initialize NVS
  esp_err_t ret = nvs_flash_init();
  if (ret == ESP_ERR_NVS_NO_FREE_PAGES || ret == ESP_ERR_NVS_NEW_VERSION_FOUND)
  {
    ESP_ERROR_CHECK(nvs_flash_erase());
    ret = nvs_flash_init();
  }
  ESP_ERROR_CHECK(ret);

  mp_start();

  pyexec_friendly_repl();

//   const char str[] = "print('Hello world of easy embedding!')";

//   execute_from_str(str);

  mp_deinit();

}
2020.10.27更新 mpHelper.c改为
#include "mpHelper.h"

#define MP_TASK_STACK_SIZE (16 * 1024)

mp_obj_t execute_from_str(const char *str)
{
    nlr_buf_t nlr;
    if (nlr_push(&nlr) == 0)
    {
        qstr src_name = 1 /*MP_QSTR_*/;
        mp_lexer_t *lex = mp_lexer_new_from_str_len(src_name, str, strlen(str), false);
        mp_parse_tree_t pt = mp_parse(lex, MP_PARSE_FILE_INPUT);
        mp_obj_t module_fun = mp_compile(&pt, src_name, false);
        mp_call_function_0(module_fun);
        nlr_pop();
        return 0;
    }
    else
    {
        // uncaught exception
        return (mp_obj_t)nlr.ret_val;
    }
}

void mp_start()
{
    volatile uint32_t sp = (uint32_t)get_sp(); // get stack pointer
    // mp_thread_init(pxTaskGetStackStart(NULL), MP_TASK_STACK_SIZE / sizeof(uintptr_t)); // ?????
    uart_init();

    #if CONFIG_ESP32_SPIRAM_SUPPORT || CONFIG_SPIRAM_SUPPORT
    // Try to use the entire external SPIRAM directly for the heap
    size_t mp_task_heap_size;
    void *mp_task_heap = (void *)0x3f800000;
    switch (esp_spiram_get_chip_size()) {
        case ESP_SPIRAM_SIZE_16MBITS:
            mp_task_heap_size = 2 * 1024 * 1024;
            break;
        case ESP_SPIRAM_SIZE_32MBITS:
        case ESP_SPIRAM_SIZE_64MBITS:
            mp_task_heap_size = 4 * 1024 * 1024;
            break;
        default:
            // No SPIRAM, fallback to normal allocation
            mp_task_heap_size = heap_caps_get_largest_free_block(MALLOC_CAP_8BIT);
            mp_task_heap = malloc(mp_task_heap_size);
            break;
    }
    #else
    // Allocate the uPy heap using malloc and get the largest available region
    size_t mp_task_heap_size = heap_caps_get_largest_free_block(MALLOC_CAP_8BIT);
    void *mp_task_heap = malloc(mp_task_heap_size);
    #endif

    mp_stack_set_top((void *)sp);
    mp_stack_set_limit(MP_TASK_STACK_SIZE - 1024);
    gc_init(mp_task_heap, mp_task_heap + mp_task_heap_size);
    mp_init();
    mp_obj_list_init(mp_sys_path, 0);
    mp_obj_list_append(mp_sys_path, MP_OBJ_NEW_QSTR(MP_QSTR_));
    mp_obj_list_append(mp_sys_path, MP_OBJ_NEW_QSTR(MP_QSTR__slash_lib));
    mp_obj_list_init(mp_sys_argv, 0);
    readline_init0();

    // mp_deinit();
}
在pio project目录下新建分区表partition_table.csv
# Name,   Type, SubType, Offset,  Size, Flags
# Note: if you have increased the bootloader size, make sure to update the offsets to avoid overlap
nvs,      data, nvs,     ,        0x6000,
phy_init, data, phy,     ,        0x1000,
factory,  app,  factory, 0x10000, 0x180000,
vfs,      data, fat,     0x200000, 0x200000,
vfs部分是内部文件系统。
然后platformio.ini中
; PlatformIO Project Configuration File
;
;   Build options: build flags, source filter
;   Upload options: custom upload port, speed and extra flags
;   Library options: dependencies, extra library storages
;   Advanced options: extra scripting
;
; Please visit documentation for the other options and examples
; https://docs.platformio.org/page/projectconf.html

[env:esp-wrover-kit]
platform = espressif32
board = esp-wrover-kit
framework = espidf
upload_speed = 115200
monitor_speed = 115200
lib_ldf_mode = chain+
build_flags = -LC:/Users/<your username>/.platformio/lib/MicroPythonEmbedded/lib -lmicropython -IC:/Users/rui/.platformio/lib/MicroPythonEmbedded
board_build.partitions = partition_table.csv
然后build以及upload,打开串口调试器,应该能够显示MicroPython的REPL了。
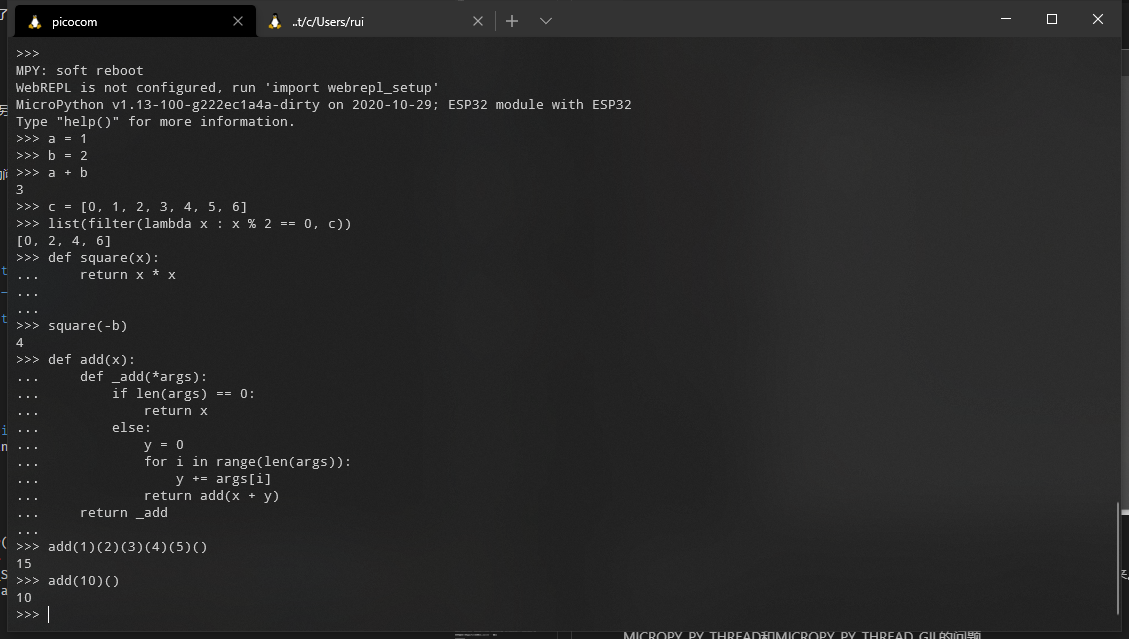
现在只能说是半成品,因为我没搞清楚之后怎么处理main.py,也不知道怎么进配套的ide;另外,一部分与FreeRTOS相关的东西我没搞懂。
附录
关于lib/MicroPythonEmbedded/目录下需要哪些文件
我没仔细看其中一些头文件具体有啥用,反正先放进去了,可能有些是没用的。
关于debug
直接链接libmicropython.a的话platformio这边是缺失了大量.c文件的,所以debug中有时候step into一个函数会发现直接跳到乱七八糟的地方去了,这点暂时无解,gdb没有源码文件估计就只能反汇编二进制文件,这种情况只能肉眼对着micropython repo下载下来的源码single step debug或者使用经典的printf debugging,当然也可能只是我不够high level,说不定有解决方法。
关于修改pio project下的sdkconfig文件
sdkconfig文件是用来生成sdkconfig.h的头文件的,生成的.h文件在.pio/build/里,用来配置esp32的一些功能。
我之前编译的时候会报PPPoS以及FreeRTOS的相关错误
undefined reference to `pppapi_pppos_create'
undefined reference to `pppapi_free'
undefined reference to `pppapi_close'
...
undefined reference to `xQueueCreateMutexStatic'
一开始是修改了.pio/build/sdkconfig.h,发现管用;后来直接改项目目录下的sdkconfig文件貌似也管用。
但是现在我发现每次build前sdkconfig好像都会被自动重置,貌似估计是跟.platformio/packages/framework-espidf下的一些sdkconfig.h有关,不过这些我也不敢乱改。但我之前的修改是实实在在管用的。目前没搞清楚是什么原因,可能是我忘了自己做过什么操作了。
2020.10.27更新
貌似改动是生效了的,每次build前会自动把相关的配置归类到一起,比如一部分连续几行配置都是FreeRTOS,一部分都是Ethernet这样。我以为是把我的改动清空了。
关于includePath
Makefile中INC_ESPCOMP变量指明了所有includePath,其中有一些内容PlatformIO的esp32相关文件似乎没有,比如ble之类的,在PlatformIO编译时需要注意这个。
关于MICROPY_PY_THREAD和MICROPY_PY_THREAD_GIL
最初我的代码能正常编译,但是固件刷进去之后esp32会无限报错重启。下面是错误信息
Guru Meditation Error: Core  0 panic'ed (LoadProhibited). Exception was unhandled.
Core 0 register dump:
PC      : 0x400da13a  PS      : 0x00060930  A0      : 0x800d2744  A1      : 0x3ffbc360
A2      : 0x3ffbc380  A3      : 0x00000000  A4      : 0x3ffb46dc  A5      : 0xffffffff
A6      : 0x3ffaffac  A7      : 0x3ffbe45c  A8      : 0x800da13a  A9      : 0x3ffbc340
A10     : 0x00000000  A11     : 0x00000000  A12     : 0x0000041e  A13     : 0x3ffbf0c6
A14     : 0x00000000  A15     : 0x00000041  SAR     : 0x0000001f  EXCCAUSE: 0x0000001c
EXCVADDR: 0x00000000  LBEG    : 0x4000c2e0  LEND    : 0x4000c2f6  LCOUNT  : 0x00000000
查了一下官方文档,他们给出的解释是
Guru Meditation 错误 本节将对打印在 Guru Meditation Error: Core panic'ed 后面括号中的致错原因进行逐一解释。
...
LoadProhibited, StoreProhibited 当应用程序尝试读取或写入无效的内存位置时,会发生此类 CPU 异常。此类无效内存地址可以在寄存器转储的 EXCVADDR 中找到。如果该地址为零,通常意味着应用程序正尝试解引用一个 NULL 指针。如果该地址接近于零,则通常意味着应用程序尝试访问某个结构体的成员,但是该结构体的指针为 NULL。如果该地址是其它非法值(不在 0x3fxxxxxx - 0x6xxxxxxx 的范围内),则可能意味着用于访问数据的指针未初始化或者已经损坏。
这里先把mpHelper.c的代码贴出来
#include "mpHelper.h"

// static char heap[16384];
// static char heap[2048];
static char *stack_top;

#define MP_TASK_STACK_SIZE (16 * 1024)

mp_obj_t execute_from_str(const char *str)
{
    nlr_buf_t nlr;
    if (nlr_push(&nlr) == 0)
    {
        qstr src_name = 1 /*MP_QSTR_*/;
        mp_lexer_t *lex = mp_lexer_new_from_str_len(src_name, str, strlen(str), false);
        mp_parse_tree_t pt = mp_parse(lex, MP_PARSE_FILE_INPUT);
        mp_obj_t module_fun = mp_compile(&pt, src_name, false);
        mp_call_function_0(module_fun);
        nlr_pop();
        return 0;
    }
    else
    {
        // uncaught exception
        return (mp_obj_t)nlr.ret_val;
    }
}

void mp_start()
{
    volatile uint32_t sp = (uint32_t)get_sp(); // get stack pointer
    // mp_thread_init(pxTaskGetStackStart(NULL), MP_TASK_STACK_SIZE / sizeof(uintptr_t)); // ?????
    uart_init();

    size_t mp_task_heap_size = heap_caps_get_largest_free_block(MALLOC_CAP_8BIT);
    void *mp_task_heap = malloc(mp_task_heap_size);

    mp_stack_set_top((void *)sp);
    mp_stack_set_limit(MP_TASK_STACK_SIZE - 1024);
    gc_init(mp_task_heap, mp_task_heap + mp_task_heap_size);
    mp_init();
    mp_obj_list_init(mp_sys_path, 0);
    // mp_obj_list_append(mp_sys_path, MP_OBJ_NEW_QSTR(MP_QSTR_));
    // mp_obj_list_append(mp_sys_path, MP_OBJ_NEW_QSTR(MP_QSTR__slash_lib));
    mp_obj_list_init(mp_sys_argv, 0);
    readline_init0();

    // mp_deinit();
}
说是访问了空指针。我尝试debug但是一开始没意识到没有源码的问题,发现点到mp_stack_set_top((void *)sp);每次都停在.platformio/packages/framework-espidf/components/esp32/pm_esp32.c,不知道哪里出了毛病,其实多点几下就会发现进入了一个汇编文件,是用来处理异常的。
然后我在主函数里调用了以下execute_from_str(),发现这里也会报一样的错误,只不过错误信息里的EXCVADDR地址变了,从0x00000000变成了0x00000010。debug发现是if (nlr_push(&nlr) == 0)这一步的毛病。
然后我就看了mp_stack_set_top和nlr_push的源码。
/* py/stackctrl.c */
void mp_stack_set_top(void *top) {
    MP_STATE_THREAD(stack_top) = top;
}

/* py/nlr.c */
void nlr_pop(void) {
    nlr_buf_t **top = &MP_STATE_THREAD(nlr_top);
    *top = (*top)->prev;
}
这两个函数有个共同点,都调用了MP_STATE_THREAD。
然后我就找了一下这个东西的定义
/* py/mpstate.h */
extern mp_state_ctx_t mp_state_ctx;

#define MP_STATE_VM(x) (mp_state_ctx.vm.x)
#define MP_STATE_MEM(x) (mp_state_ctx.mem.x)

#if MICROPY_PY_THREAD
extern mp_state_thread_t *mp_thread_get_state(void);
#define MP_STATE_THREAD(x) (mp_thread_get_state()->x)
#else
#define MP_STATE_THREAD(x) (mp_state_ctx.thread.x)
#endif
发现是一个宏,访问mp_state_ctx这个结构体的成员,它是在mpstate.c中定义的。
然后我又看了这个结构体
typedef struct _mp_state_mem_t {
    ...
} mp_state_mem_t;

typedef struct _mp_state_vm_t {
    ...
} mp_state_vm_t

// This structure holds state that is specific to a given thread.
// Everything in this structure is scanned for root pointers.
typedef struct _mp_state_thread_t {
    // Stack top at the start of program
    char *stack_top;

    #if MICROPY_STACK_CHECK
    size_t stack_limit;
    #endif

    #if MICROPY_ENABLE_PYSTACK
    uint8_t *pystack_start;
    uint8_t *pystack_end;
    uint8_t *pystack_cur;
    #endif

    ////////////////////////////////////////////////////////////
    // START ROOT POINTER SECTION
    // Everything that needs GC scanning must start here, and
    // is followed by state in the mp_state_vm_t structure.
    //

    mp_obj_dict_t *dict_locals;
    mp_obj_dict_t *dict_globals;

    nlr_buf_t *nlr_top;

    #if MICROPY_PY_SYS_SETTRACE
    mp_obj_t prof_trace_callback;
    bool prof_callback_is_executing;
    struct _mp_code_state_t *current_code_state;
    #endif
} mp_state_thread_t;

// This structure combines the above 3 structures.
// The order of the entries are important for root pointer scanning in the GC to work.
typedef struct _mp_state_ctx_t {
    mp_state_thread_t thread;
    mp_state_vm_t vm;
    mp_state_mem_t mem;
} mp_state_ctx_t;
估计是辅助存储上下文的。这里有一点让我比较在意,之前访问stack_top和nlr_top报的错误地址分别是0x00000000和0x00000010,差了16个byte。然后看一下mp_state_thread_t的一部分组成
char *stack_top;

#if MICROPY_STACK_CHECK
size_t stack_limit;
#endif

#if MICROPY_ENABLE_PYSTACK
uint8_t *pystack_start;
uint8_t *pystack_end;
uint8_t *pystack_cur;
#endif

mp_obj_dict_t *dict_locals;
mp_obj_dict_t *dict_globals;

nlr_buf_t *nlr_top;
这些东西除了指针就是int,都是4字节,去掉中间那几个pystack的start end cur,nlr_top和stack_top的地址正好差16字节。查一下MICROPY_ENABLE_PYSTACK发现设的是0。显然问题就是出在mp_state_ctx上。
然后我很naive地以为是mp_state_ctx没分配内存,后来发现它不是一个指针用不着malloc;然后我又naive地以为是宏定义没被预处理,因为我在mpHelper.c里面直接写MP_STATE_THREAD(stack_top) = (void *)sp也报一样的错误。结果我意识到之前debug的时候到gc_init(mp_task_heap, mp_task_heap + mp_task_heap_size);这一步没报错。这个函数里面调用了很多MP_STATE_MEM(x),所以跟宏定义其实没关系。
然后我尝试在mpHelper.c里调用MP_STATE_VM和MP_STATE_MEM,没报错,那么真相只有一个,mp_state_ctx.thread有问题。
#if MICROPY_PY_THREAD
extern mp_state_thread_t *mp_thread_get_state(void);
#define MP_STATE_THREAD(x) (mp_thread_get_state()->x)
#else
#define MP_STATE_THREAD(x) (mp_state_ctx.thread.x)
#endif
查了一下MICROPY_PY_THREAD发现是1,那么很可能是#define MP_STATE_THREAD(x) (mp_thread_get_state()->x)这个操作出了问题。
这个mp_thread_get_state的代码是这样的
mp_state_thread_t *mp_thread_get_state(void) {
    return pvTaskGetThreadLocalStoragePointer(NULL, 1);
}
跟线程操作有关。
于是我把micropython repo中mpconfigport.h的MICROPY_PY_THREAD和MICROPY_PY_THREAD_GIL都改成了0,重新编译一个静态库出来,果然正常了。
mp_start的mp_thread_init(pxTaskGetStackStart(NULL), MP_TASK_STACK_SIZE / sizeof(uintptr_t));被我注释掉了,原本的代码里是有的,可能是用来新建一个线程给micropython虚拟机用。因为上面把MICROPY_PY_THREAD去掉了所以我也就把那行也注释掉了,可能这行代码也有坑。
2020.10.27更新
把MICROPY_PY_THREAD和MICROPY_PY_THREAD_GIL改回1了,只要在sdkconfig做这个改动
#CONFIG_FREERTOS_THREAD_LOCAL_STORAGE_POINTERS=1
CONFIG_FREERTOS_THREAD_LOCAL_STORAGE_POINTERS=2
这个东西的作用是配置线程局部指针变量的个数,不知道之前为啥会报错。
关于堆空间
我在mpHelper.c中的mp_start中是这么分配的
size_t mp_task_heap_size = heap_caps_get_largest_free_block(MALLOC_CAP_8BIT);
void *mp_task_heap = malloc(mp_task_heap_size);
但是micropython repo的main.c是这样的
// TODO: CONFIG_SPIRAM_SUPPORT is for 3.3 compatibility, remove after move to 4.0.
#if CONFIG_ESP32_SPIRAM_SUPPORT || CONFIG_SPIRAM_SUPPORT
// Try to use the entire external SPIRAM directly for the heap
size_t mp_task_heap_size;
void *mp_task_heap = (void *)0x3f800000;
switch (esp_spiram_get_chip_size()) {
    case ESP_SPIRAM_SIZE_16MBITS:
        mp_task_heap_size = 2 * 1024 * 1024;
        break;
    case ESP_SPIRAM_SIZE_32MBITS:
    case ESP_SPIRAM_SIZE_64MBITS:
        mp_task_heap_size = 4 * 1024 * 1024;
        break;
    default:
        // No SPIRAM, fallback to normal allocation
        mp_task_heap_size = heap_caps_get_largest_free_block(MALLOC_CAP_8BIT);
        mp_task_heap = malloc(mp_task_heap_size);
        break;
}
#else
// Allocate the uPy heap using malloc and get the largest available region
size_t mp_task_heap_size = heap_caps_get_largest_free_block(MALLOC_CAP_8BIT);
void *mp_task_heap = malloc(mp_task_heap_size);
#endif
因为micropython/port/esp32/boards/sdkconfig.spiram里写了CONFIG_ESP32_SPIRAM_SUPPORT=y,所以我一开始是照着#else上面那部分写的,发现这样能正常进REPL界面也就是执行pyexec_friendly_repl函数,但是似乎没有符号表,也就是预定义的qstr pool,执行print("Hello World")会报SyntaxError。改成#else下面那部分就正常了。这里也不清楚原因。
2020.10.27更新
sdkconfig里加
CONFIG_ESP32_SPIRAM_SUPPORT=y
貌似能正常跑#else上半部分了,这个东西是配置外置RAM的。
关于QSTR
在mp_start中我注释掉了这两行代码,原代码是有这个的。
// mp_obj_list_append(mp_sys_path, MP_OBJ_NEW_QSTR(MP_QSTR_));
// mp_obj_list_append(mp_sys_path, MP_OBJ_NEW_QSTR(MP_QSTR__slash_lib));
原因是MP_QSTR_和MP_QSTR__slash_lib是undefined。
在py/qstrdefs.h中有这样一段注释
// All the qstr definitions in this file are available as constants.
// That is, they are in ROM and you can reference them simply as MP_QSTR_xxxx.
所以这两个应该是表示""和"/lib",但是QSTR中怎么表示的不知道,应该不能在代码中直接替换。这个问题也不知道要引入什么文件怎么解决。有个qstrdefs.generated.h文件里面有很多形如QDEF(MP_QSTRnull, (const byte*)"\x00\x00\x00" ""),但这个文件是python脚本生成的,C文件里没找到#define QDEF()之类的字样。这也是一个问题。
2020.10.28更新
上面两行被注释的代码已经恢复了。
QDEF相关代码大量出现在genhdr/qstrdefs.generated.h,这个文件分别在两个文件里被include
/* qstr.h */
enum {
    #ifndef NO_QSTR
#define QDEF(id, str) id,
    #include "genhdr/qstrdefs.generated.h"
#undef QDEF
    #endif
    MP_QSTRnumber_of, // no underscore so it can't clash with any of the above
};

typedef struct _qstr_pool_t {
    struct _qstr_pool_t *prev;
    size_t total_prev_len;
    size_t alloc;
    size_t len;
    const byte *qstrs[];
} qstr_pool_t;

/* qstr.c */
const qstr_pool_t mp_qstr_const_pool = {
    NULL,               // no previous pool
    0,                  // no previous pool
    MICROPY_ALLOC_QSTR_ENTRIES_INIT,
    MP_QSTRnumber_of,   // corresponds to number of strings in array just below
    {
        #ifndef NO_QSTR
#define QDEF(id, str) str,
        #include "genhdr/qstrdefs.generated.h"
#undef QDEF
        #endif
    },
};
发现在不同文件里QDEF的意义是不同的,qstr.h里是取了前半部分也就是之前被我注释掉的MP_QSTR_那些东西,后半部分是由哈希值长度以及实际字符串组成的字符串。
qstr.h里用了个enum说明MP_QSTR_这些东西是被转换成int了,大概是作为qstr pool里const byte *qstrs[]的index。
然后就知道为什么之前这两行代码为什么MP_QSTR_是undefined了
mp_obj_list_append(mp_sys_path, MP_OBJ_NEW_QSTR(MP_QSTR_));
mp_obj_list_append(mp_sys_path, MP_OBJ_NEW_QSTR(MP_QSTR__slash_lib));
因为我没把genhdr/qstrdefs.generated.h这个文件放到.platformio下面,于是之前qstr.h里的#include "genhdr/qstrdefs.generated.h"被我直接删掉了,这件事还被我忘了,第一时间没反应过来。
全部修正之后就不会报错了。
本文章使用limfx的vscode插件快速发布