vs code配置vue开发环境
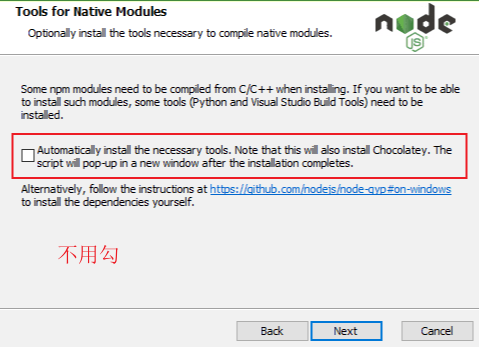
安装node.js
安装过程
检查安装
在控制台输入
node -v //检查node安装版本
npm -v //npm是node包管理工具
安装相关插件
1.Vetur
alt+shift+f 格式化全文 alt+k+f 格式化选中代码
vue格式设置
File-->Preferences-->Settings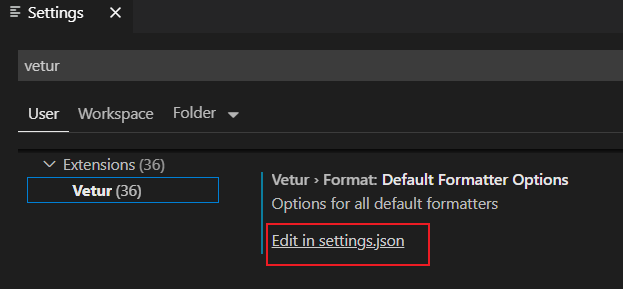
settings.json代码
    "vetur.format.defaultFormatter.html": "js-beautify-html",
        "emmet.includeLanguages": {
            "wxml": "html"
        },
        "minapp-vscode.disableAutoConfig": true,
        "explorer.confirmDelete": false,
        "vetur.format.options.tabSize": 2,
        "vetur.format.defaultFormatterOptions":{

            "js-beautify-html":{
                "wrap_attributes":"auto"
            }
        }
2.ESLint
语法纠错,能检测代码语法问题、格式问题
3.LiveServer
alt+l+o(在文件上右击出现Open with Live Server选项,会自动打开浏览器)打开一个简单的web服务器,支持自动刷新,默认端口号5500
4.HTML CSS Support
样式表自动补全功能
5.JavaScript snippet Pack
包含js常用语法关键字
6.HTML Snippets
包含html标签
安装脚手架vue cli
1.进入一个目录,创建项目
vue create provue //provue为项目文件名
2.选择配置方式
按↓选择Manually select features,手动配置
3.选择配置项
通过↑↓选择要配置的项,按空格是选中,a全选,i反选 我的选择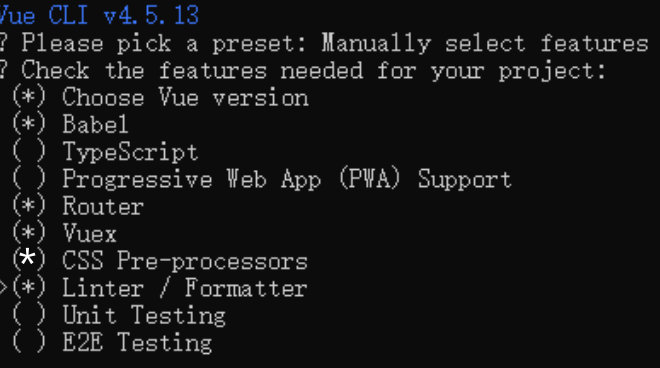
或者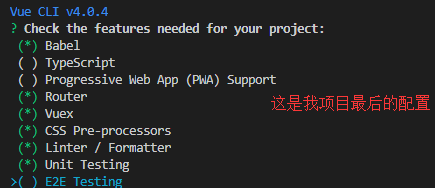
? Check the features needed for your project: (Press <space> to select, <a> to toggle all, <i> to invert selection)
>( ) Babel //转码器,可以将ES6代码转为ES5代码,从而在现有环境执行。
( ) TypeScript// TypeScript是一个JavaScript(后缀.js)的超集(后缀.ts)包含并扩展了 JavaScript 的语法,需要被编译输出为 JavaScript在浏览器运行
( ) Progressive Web App (PWA) Support// 渐进式Web应用程序
( ) Router // vue-router(vue路由)
( ) Vuex // vuex(vue的状态管理模式)
( ) CSS Pre-processors // CSS 预处理器(如:less、sass)
( ) Linter / Formatter // 代码风格检查和格式化(如:ESlint)
( ) Unit Testing // 单元测试(unit tests)
( ) E2E Testing // e2e(end to end) 测试
3.1选择是否使用history router
Vue-Router利用了浏览器自身的hash模式和history模式的特性来实现前端路由(通过调用浏览器提供的接口)
3.2选择css预处理器
因公司原因选择less
node-sass是自动编译实时的,dart-sass需要保存后才会生效。sass官方目前主力推dart-sass,最新的特性都会在这个上面实现
3.3选择Eslint代码验证规则
提供一个插件化的JavaScript代码检测工具,ESLint+Prettier使用较多
3.4选择什么时候进行代码规则检测
建议选择保存就检测
( ) Lint on save // 保存就检测
( ) Lint and fix on commit // fix和commit时候检查
3.5选择单元测试
建议选择jest
Mocha + Chai //mocha灵活,只提供简单的测试结构,如果需要其他功能需要添加其他库/插件完成。必须在全局环境中安装
Jest //安装配置简单,容易上手。内置Istanbul,可以查看到测试覆盖率,相较于Mocha:配置简洁、测试代码简洁、易于和babel集成、内置丰富的expect
3.6选择如何存放配置
建议选择in package.json
In dedicated config files // 独立文件放置
In package.json // 放package.json里
如果是选择独立文件放置,项目会有.browserslistrc .eslintrc.js postcss.config.js文件单独在项目下
3.7是否保存当前配置
键入n不记录,如果键入y需要输入保存名字,下次配置时会出现保存名字 参考自https://www.cnblogs.com/sese/p/11712275.html
等待项目创建
执行给出的命令,就可直接访问
在vs code中创建vue的html模板
设置-->用户代码块,查找html.json
html.json代码
"print to console" : {
		"prefix": "vue",
		"body": [
			"    <div id=\"app\">",
			"        ",
			"    </div>",
			"",
			"    <script>",
			"        const vm=new Vue({",
			"           el:'#app',",
			"           data:{},",
			"           methods:{}",
			"        });",
			"    </script>",

		],
		"description": "vue 's model"
		}
安装view ui
在vs code中打开vue cli项目 File-->Add Filder to Workspace-->选择项目文件
安装
打开src下的.vue文件
打开vs code终端ctrl+`(view-->Terminal)
使用 npm 来安装
npm install view-design --save
本文章使用limfx的vscode插件快速发布